

- Home ›
- Kids Cooking Lessons ›
- Basic Cooking Lessons ›
- Coating and Breading Technique
Coating and Breading Technique for Kids
Learning how to coat and bread food is a useful basic cooking skill for kids. This technique is often called dredging and is used to make foods such as breaded chicken, chicken fingers, pork chops, eggplant Parmesan, fish, and breaded vegetables.
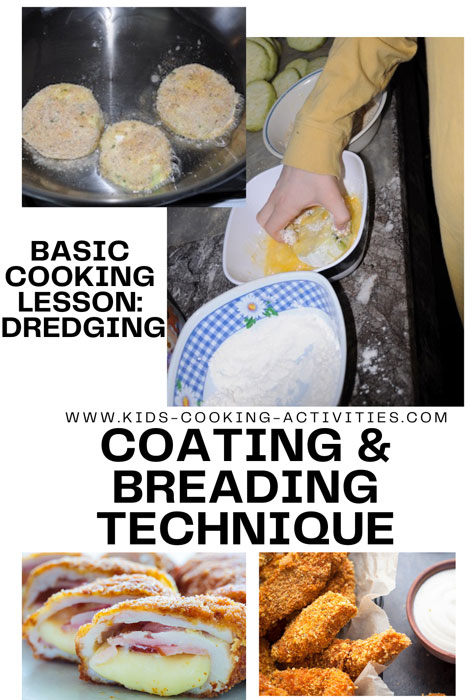
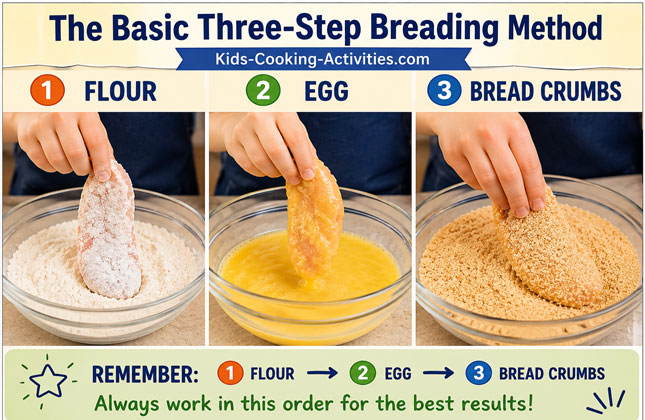
The basic technique is simple: food is dipped into one or more coatings before it is cooked. A traditional three-step breading station uses flour → egg or another wet ingredient → bread crumbs. Each layer has a job and helps the final coating stick to the food.
This kids cooking lesson explains how coating and breading works, how to set up an easy dredging station, and how to keep the process from becoming too messy. Then kids can practice the technique with Chicken Parmesan, Eggplant Parmesan, Breaded Pork Chops, and Chicken Piccata.
What Kids Will Learn
- What dredging, coating, and breading mean
- How to set up a breading station
- Why flour, egg, and bread crumbs are used in a particular order
- How to keep wet and dry ingredients separate while breading
- How different coatings change the texture of food
- How to safely handle raw chicken and pork during a cooking lesson
Kids Cooking Activities Teaching Materials
Teaching kids to cook? Save time with ready-made lesson plans used by parents and teachers. Browse teaching materials →


This page may contain affiliate links. We may earn a small commission at no extra cost to you. Learn more.
How to Coat and Bread Food
Before you begin, arrange shallow bowls or pie plates in the order you will use them. This creates a breading station and makes it easier to move each piece of food from one coating to the next.
The Basic Three-Step Breading Method
- Flour: Lightly coat the food with flour and shake off the excess. Flour creates a dry surface that helps the next layer stick.
- Egg or wet coating: Dip the floured food into beaten egg, milk, or buttermilk. Let the extra liquid drip off.
- Bread crumbs: Place the food in bread crumbs and gently press the crumbs onto all sides.
Not every recipe needs all three steps. Some recipes use only a wet coating followed by bread crumbs or seasoned flour. The recipes below let kids practice several variations of the technique.
Tips for Successful Breading
Keep One Hand Dry
Use one hand for dry ingredients such as flour and bread crumbs and the other hand for the wet coating. This helps prevent breading from building up on your fingers.
Shake Off the Extra
A thick layer of flour or dripping wet coating can make the breading uneven. Gently shake or drip off the excess before moving to the next step.
Press, Don't Pack
Gently press bread crumbs onto the food so they stick, but don't pile on an extra-thick layer.
Work in Order
Set up the food, flour, wet coating, bread crumbs, and cooking pan in a row. Moving in one direction makes the cooking lesson easier and less messy.
Food Safety During Breading
When breading raw chicken or pork, wash hands thoroughly with soap and water after handling the raw meat. Wash dishes, utensils, and work surfaces that touched raw meat before using them again, and don't reuse leftover flour, egg, milk, or bread crumbs that have come in contact with raw meat.
Recipes for Practicing Coating and Breading
Each recipe below uses the technique a little differently. Start with the method that best matches the skill you want to practice.
Chicken Parmesan with Homemade Tomato Basil Sauce
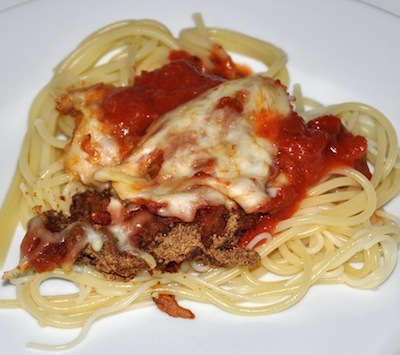


Chicken Parmesan is a great recipe for practicing the coating and breading technique. The chicken is dipped in beaten egg and then pressed into a Parmesan breadcrumb mixture before baking. This creates a flavorful coating that helps keep the chicken tender inside.
Prep Time: 25 minutes
Cook Time: 25-30 minutes
Yield: 6-8 servings
Ingredients
For the Chicken
- 2 pounds boneless, skinless chicken breasts
- Salt and pepper, to taste
- 1 teaspoon dried Italian seasoning
- 2 eggs
- 1/2 cup bread crumbs
- 1/2 cup grated Parmesan cheese
- 1-2 tablespoons olive oil
- 8 ounces fresh mozzarella, sliced or shredded
For the Tomato Basil Sauce
- 2 tablespoons olive oil
- 3-4 cloves garlic, minced
- 2 cans (14 ounces each) whole tomatoes
- Salt and pepper, to taste
- 1/4 cup chopped fresh basil
For Serving
- 1 pound angel hair pasta or other pasta
- Extra grated Parmesan cheese, optional
- Fresh basil, optional
Directions
- Preheat the oven to 400F. Lightly coat a baking dish or baking sheet with olive oil or cooking spray.
- Cut the chicken breasts into thin cutlets or wide strips of similar thickness. Season both sides with salt, pepper, and Italian seasoning.
- Set out two shallow dishes or pie plates. Crack the eggs into the first dish and beat them with a fork. In the second dish, stir together the bread crumbs and Parmesan cheese.
- Practice the coating technique: Dip one piece of chicken into the beaten egg, allowing the excess egg to drip back into the dish.
- Practice the breading technique: Transfer the chicken to the breadcrumb mixture. Turn it over and gently press the crumbs onto both sides so the chicken is evenly coated.
- Repeat with the remaining chicken, placing each breaded piece in the prepared baking dish or on the baking sheet. Drizzle or lightly brush the tops with a little olive oil.
How Coating and Breading Works
Think of breading as a simple three-part process: season → wet coating → dry coating. The beaten egg gives the bread crumbs something to stick to, while the bread crumbs and Parmesan create the flavorful outside layer. Milk or buttermilk can also be used as a wet coating in other breaded chicken recipes.
- Bake the chicken for about 15-20 minutes, or until nearly cooked through. Cooking time will depend on the thickness of the chicken.
- While the chicken bakes, make the sauce. Use clean kitchen scissors to carefully cut the whole tomatoes into smaller pieces while they are still in the cans, or break them apart with a wooden spoon after adding them to the pan.
- Heat 2 tablespoons olive oil in a saucepan over medium heat. Add the minced garlic and sauté for about 30 seconds, just until fragrant.
- Add the tomatoes, salt, and pepper. Bring to a gentle simmer and cook for 10–15 minutes, breaking up the tomatoes with a wooden spoon as they cook. Stir in the fresh basil.
- Remove the chicken from the oven and spoon some tomato sauce over each piece. Top with fresh mozzarella.
- Return the chicken to the oven for about 5 minutes, or until the cheese is melted and the chicken reaches an internal temperature of 165F.
- Meanwhile, cook the angel hair pasta according to the package directions and drain.
- Serve the Chicken Parmesan with the pasta and additional tomato-basil sauce. Sprinkle with Parmesan and fresh basil, if desired.
Kids Can Help
Kids can measure and mix the bread crumbs and Parmesan, beat the eggs, tear or chop basil with age-appropriate tools, and help set up the breading station. Older children who are ready to handle raw chicken can practice dipping and breading with close adult supervision. Everyone should wash their hands thoroughly with soap and water immediately after handling raw chicken.
While dinner cooks, kids can also help prepare an easy fruit salad or green salad to serve alongside the Chicken Parmesan.
Eggplant Parmesan
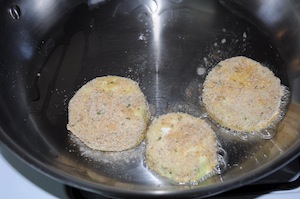
Eggplant Parmesan is a great recipe for practicing the complete three-step coating and breading technique. Each eggplant slice is coated in flour, dipped in egg, and covered with bread crumbs before being browned and topped with tomato sauce and mozzarella cheese.
Prep Time: 20 minutes
Cook Time: 20-25 minutes
Yield: 4-6 servings
Ingredients
- 1 large eggplant
- 1/2 cup all-purpose flour
- 2 eggs, beaten
- 1 cup bread crumbs
- 2-3 tablespoons olive oil, as needed
- 1-1 1/2 cups spaghetti or marinara sauce
- 1 cup shredded mozzarella cheese
Directions
- Preheat the oven to 400F. Lightly coat a casserole dish with cooking spray or a small amount of oil.
- Wash the eggplant and cut it crosswise into slices about 1/2-inch thick.
- Set out three shallow dishes or pie plates to create a dredging station. Place the flour in the first dish, beaten eggs in the second, and bread crumbs in the third.
- Step 1 - Flour: Place an eggplant slice in the flour. Turn it over to lightly coat both sides, then shake off the excess.
- Step 2 - Egg: Dip the floured eggplant into the beaten egg, turning it so both sides are coated. Allow the extra egg to drip back into the dish.
- Step 3 - Bread crumbs: Transfer the eggplant to the bread crumbs. Turn it over and gently press the crumbs onto both sides.
- Repeat the flour, egg, and breadcrumb steps with the remaining eggplant slices.
- Heat a small amount of olive oil in a large skillet over medium heat. Add the breaded eggplant slices in a single layer, working in batches if necessary.
- Cook until the coating is golden brown and crisp, then turn the slices and brown the second side. Add a little more oil between batches if needed.
- Transfer the browned eggplant slices to the prepared casserole dish.
- Spoon a small amount of spaghetti or marinara sauce over each piece and sprinkle with mozzarella cheese.
- Bake for 10-15 minutes, or until the eggplant is tender, the sauce is hot, and the cheese is melted.
Why Eggplant Is Good for Breading Practice
Eggplant is a helpful food for kids who are learning this technique because the slices are flat and easy to turn in each coating. Unlike raw chicken or pork, it also lets beginners practice the flour - egg - bread crumbs sequence without handling raw meat.
Try It with Zucchini
You can practice the same coating and breading technique with zucchini. Cut the zucchini into thick slices, coat each piece in flour, egg, and bread crumbs, and cook until golden and tender.
Breaded Pork Chops
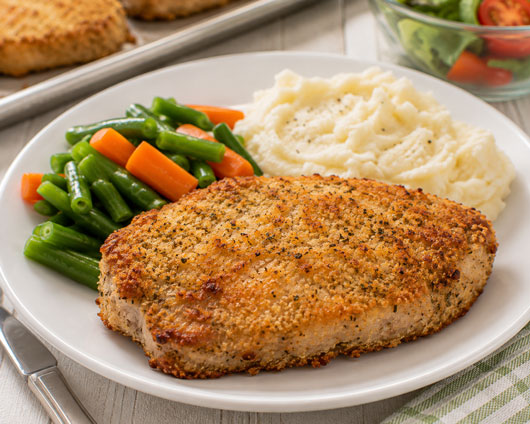
These oven-baked pork chops are another great way to practice the coating and breading technique. This recipe uses three layers - seasoned flour, milk or buttermilk, and bread crumbs - to create a crisp coating without frying.
Prep Time: 15 minutes
Cook Time: 20-30 minutes
Yield: 4-6 servings
Ingredients
- 4-6 boneless pork loin chops
- 1/2 cup all-purpose flour
- 1/2 teaspoon seasoned salt
- 1/4 cup milk, plain yogurt, or buttermilk
- 1/2 cup Italian-style dry bread crumbs
- Cooking spray
Directions
- Preheat the oven to 375F. Lightly coat a casserole dish or baking sheet with cooking spray.
- If the pork chops are very thick, have an adult carefully slice them into thinner pieces so they cook more evenly.
- Set three shallow dishes or pie plates next to each other to make a breading station.
- In the first dish, stir together the flour and seasoned salt. Pour the milk, yogurt, or buttermilk into the second dish. Add the bread crumbs to the third dish.
- Step 1 - Flour: Place each pork chop in the seasoned flour and turn it over to lightly coat both sides. Shake off any excess flour.
- Step 2 - Wet coating: Dip the floured pork chop into the milk or buttermilk, coating both sides.
- Step 3 - Bread crumbs: Transfer the pork chop to the bread crumbs. Turn and gently press the crumbs onto both sides until evenly coated.
- Place the breaded pork chops in the prepared baking dish. Repeat with the remaining pork chops.
- Lightly spray the tops with cooking spray. This helps the bread crumbs become golden and crisp in the oven.
- Bake for about 20-30 minutes, depending on the thickness of the pork chops, until cooked through. Pork should reach a safe internal temperature of 145F, followed by a 3-minute rest.
Why Use Three Coatings?
The flour gives the wet coating something to cling to. The milk or buttermilk then helps the bread crumbs stick to the pork. Layering the coatings in this order creates a more even breading that is less likely to fall off during cooking.
Make Ahead Tip
You can bread the pork chops ahead of time, cover them, and refrigerate until you are ready to bake dinner. Keep raw pork refrigerated and separate from ready-to-eat foods.
Chicken Piccata with Honey Lemon Sauce
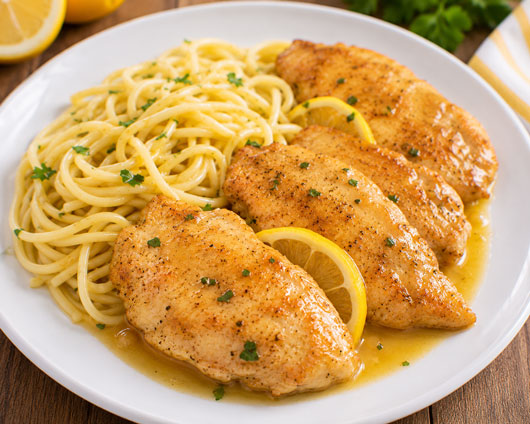
This easy Chicken Piccata combines lightly breaded chicken with a sweet and tangy honey-lemon sauce. It is a good recipe for practicing a simpler two-step coating technique: first dip the chicken in milk, then coat it with seasoned flour or bread crumbs.
Prep Time: 15 minutes
Cook Time: 20 minutes
Yield: 4 servings
Ingredients
For the Chicken
- 1 pound boneless, skinless chicken breasts
- 1 cup all-purpose flour or bread crumbs
- 1/2 cup grated Parmesan cheese
- 1 tablespoon Italian seasoning
- 1/2 cup milk
- 1-2 tablespoons olive oil, as needed
For the Honey Lemon Sauce
- 2 tablespoons butter
- 1/4 cup honey
- Juice of 1 lemon
For Serving
- Hot cooked pasta
Directions
- Bring a pot of water to a boil and cook the pasta according to the package directions.
- Meanwhile, place the chicken breasts between sheets of parchment paper or plastic wrap. With adult supervision, gently flatten them with a kitchen mallet until they are an even thickness.
- Cut the flattened chicken into smaller pieces or strips.
- Set two shallow dishes or pie plates next to each other. Pour the milk into the first dish.
- In the second dish, combine the flour or bread crumbs, Parmesan cheese, and Italian seasoning.
- Coat the chicken: Dip a piece of chicken into the milk, allowing the excess to drip off.
- Add the breading: Place the chicken in the flour or breadcrumb mixture. Turn it over and gently press the coating onto both sides.
- Repeat with the remaining chicken.
- Heat a small amount of olive oil in a large skillet over medium heat. Add the chicken without overcrowding the pan.
- Cook the chicken until golden on both sides and completely cooked through. The center of the chicken should reach 165°F.
- Transfer the cooked chicken to a clean plate.
- Reduce the heat and add the butter, honey, and lemon juice to the skillet. Stir together and cook for 2–3 minutes until warm and combined.
- Return the chicken to the pan and spoon the honey-lemon sauce over the pieces, or pour the sauce over the chicken when serving.
- Drain the cooked pasta and serve it with the chicken and honey-lemon sauce.
Flour or Bread Crumbs?
Flour creates a thin, delicate coating that works especially well with the honey-lemon sauce. Bread crumbs make the outside thicker and crispier. Try the recipe both ways to see how changing the dry coating changes the finished chicken.
Practice the Skill with Other Foods
Once kids understand the basic coating and breading technique, they can use the same skill with many different foods. Try breading chicken strips, fish fillets, zucchini slices, cauliflower, mushrooms, or other vegetables. Changing the wet coating, seasonings, and bread crumbs is also an easy way to experiment with flavor and texture.
Cooking Lesson Challenge
Choose one food and prepare a simple breading station. Before cooking, ask kids to predict what each coating will do. After cooking, look at the outside of the food and talk about whether the breading stayed attached, became crisp, and browned evenly.
For another experiment, compare a piece coated with flour and egg only to one finished with bread crumbs. Which coating becomes crispier?
Related Basic Cooking Lessons
Coating and breading is just one of the techniques young cooks can learn. Continue building kitchen confidence with these basic cooking lessons and skill guides.




Coating and Breading FAQ
What does dredging mean in cooking?
Dredging means lightly coating food in a dry ingredient, such as flour or bread crumbs, before cooking. Some breading methods use several coatings, such as flour followed by egg and then bread crumbs. Dredging helps create a flavorful outside coating and can give foods a golden, crispy texture.
What is the correct order for breading food?
The traditional three-step breading order is flour → egg → bread crumbs. First coat the food lightly with flour and shake off the excess. Next dip it in beaten egg, allowing extra egg to drip off. Finally, coat it with bread crumbs and gently press them onto the food.
Why do you dip food in flour before egg?
Flour creates a dry surface that helps the egg cling to the food. The egg then helps the bread crumbs stick. Using the coatings in this order can create a more even breading that is less likely to fall off during cooking.
Can you use milk instead of egg for breading?
Yes. Some recipes use milk, buttermilk, or another wet ingredient instead of beaten egg. Egg usually creates a stronger coating, while milk or buttermilk can work well for lighter breading. The Breaded Pork Chops and Chicken Piccata recipes on this page demonstrate different wet-coating options.
How do you keep breading from falling off?
Shake off excess flour before dipping the food into the wet coating, let excess egg or milk drip off, and gently press the bread crumbs onto the food. Avoid piling on a coating that is too thick. Using one hand for wet ingredients and one for dry ingredients also makes it easier to coat the food evenly.
What foods can kids practice breading?
Kids can practice coating and breading with eggplant, zucchini, mushrooms, cauliflower, chicken strips, pork chops, and fish. Vegetables such as eggplant and zucchini are especially useful for beginners because kids can practice the complete breading sequence without handling raw meat. Choose foods and cooking tasks that are appropriate for the child's age and kitchen experience.
Basic Cooking Lessons Stock and soups 5 mother sauces Yeast and baking breads Herbs and spices Vegetables Dry beans Grains Eggs Different cooking methods Growing an herb garden How to Cook Q&A
Get Free Kids Recipe Cards + Cooking Printables
Join Kids Cooking Activities for fun recipes, cooking ideas, and printable resources for kids, families, and classrooms.
Follow Kids Cooking Activities too:





© Debbie Madson, Madson Web Publishing, LLC — All rights reserved.
The material on this site is for educational purposes only.